Key Points
- To find your lost Windows device, go to www.account.microsoft.com/devices, click “Find my device,” click on the lost device, and then click Find.
- You can also click Lock to lock the device remotely and display a message.
- To set up Find My Device, make sure to use an Administrator account linked with a Microsoft account, and that Location services are enabled.
Using portable devices like tablets, phones, and laptops has its perks, but also has its downsides. Since they are extremely portable they are more prone to theft. We all know from advanced sci-fi movies that cell phones can be traced using cell towers and whatnot, but what about laptops? Can they also be traced?
Thankfully, Microsoft has a nifty feature in the Windows 10 and 11 operating systems, known as “Find My Device,” that lets you know your Windows device’s location at all times. This feature can be enabled or disabled during the Windows setup screens, or you can later configure it. To be able to track your Windows devices, it is always recommended that you keep this feature enabled.
That being said, Find My Device uses GPS location information and an active internet connection to determine the location of the computer, which needs to be enabled. Additionally, it also consumes more power.
If you fear losing your Windows 11 computer, then you need to set it up so it can be tracked when needed. In this post, we are going to show you how to set up and enable Find My Device, and then how to use it to track and lock your computer remotely in case of distress.
What is Find My Device in Windows
Find My Device is a Windows feature that lets you track and lock your computer. It can be used to see where your friends and family are located or track the device in case it is stolen.
Find My Device uses your device’s integrated GPS and transmits the coordinates where it is authorized and requested, using the internet. The coordinates are then displayed on a map to the user who requested the location of the device. Of course, only authorized people can access that kind of information.
To use Find My Device on your Windows PC, you must first ensure that the following requirements are met:
- You should be logged in from an administrative account.
- The device that needs to be tracked should be logged in with a Microsoft account.
- The location services must be enabled
- The device must have an active internet connection
This tells us that as soon as the computer that needs to be tracked is connected to the internet, and the remaining requirements are already satisfied, you will get the location of the device remotely and track it. Moreover, you can also lock the device remotely while displaying a message for the person in possession of the lost/stolen device.
How to set up Find My Device on Windows
To set up Find My Device, you need to make sure that the abovementioned requirements are first satisfied. Perform the following processes to ensure that it is such before enabling Find My Device on your Windows 11 computer.
Sign in with a Microsoft account
One of the requirements for being able to track your device is to be logged in with a Microsoft account. First, you must check what kind of account you are using. Here are the steps to check whether you are using a Microsoft account or a local computer account:
-
Press the Windows Key + i to open the Settings app.
-
Click Accounts on the left.

Open the Accounts Settings page -
You will now see the type of user account at the top of the page, including whether it is an administrative or a standard account.
Note: If it is a standard user account, then nothing will be written below “Local Account.” Moreover, if it is a Microsoft account, then you will see the Microsoft ID written instead.

Check whether you are signed in with local or administrative account


If you find that you are using a local user account instead of a Microsoft account, use the following steps to sign in with a Microsoft account instead:
-
Press the Windows key + i to open the Settings app.
-
Click Accounts on the left.
-
Click “Microsoft account” on the right to expand it, and then click “Sign in.”

Sign in with a Microsoft account -
Enter your Microsoft account email address and click Next.

Enter your Microsoft email address -
Enter the password and click “Sign in.”

Sign in to the Microsoft account -
When asked to create a PIN, follow the on-screen instructions and create a secure, memorable PIN.
-
When done, restart the computer.


When the computer restarts, you will be required to sign in using the PIN.
Use an administrator account
The user account should not only be a Microsoft account, but it should also have administrative rights. While a standard user can also track Windows devices with Microsoft accounts, only an administrator can make changes to it.
You can check whether you have an administrative or a standard account from Settings > Accounts page. If you find that it is not an administrative account, you can either enable the built-in Administrator account and link your Microsoft account to it, or use the following steps to convert the standard account into an administrative account:
Note: Only an administrative account can change a standard account to an administrative account. Therefore, the following steps need to be performed using an administrator account.
-
Press the Windows Key + i to open the Settings app.
-
Click Accounts on the left, and then click “Other users” on the right side.

Open “Other users” Settings page -
Click on the account to expand it, and then click “Change account type.”

Change account type from Settings -
Select Administrator from the drop-down menu under “Account type,” and then click OK.

Set the standard account as an administrator account


The account will now be an administrative account.
By performing both of the methods above for having an administrative account logged in with a Microsoft account, your “Accounts” Settings page should look like this:

Enable Location services
Now, the only thing from the requirements is enabling the Location services. Only when it is enabled can other Windows services use the integrated GPS to track the device’s location.
Here are the steps to enable Location services:
-
Press the Windows Key + i to open the Settings app.
-
Click “Privacy & security” on the left, and then click Location on the right side.

Open Location settings -
Toggle the slider in front of “Location services” into the On position.

Enable Location services in Windows


Now, all that is left is enabling the Find My Device feature.
Enable Find My Device
Use the following steps to enable Find My Device on your Windows 11 computer:
-
Press the Windows Key + i to open the Settings app.
-
Click “Privacy & security” on the left, and then click “Find my device” on the right side.

Open “Find My Device” Settings -
Toggle the slider in front of “Find my device” into the On position.

Enable Find My Device


You have now successfully enabled “Find my device.” Now, in case your device gets lost or stolen, you can use your Microsoft account to track its location, and even lock it remotely while displaying a message for the person in possession of it.
Find and lock Windows computer with Find My Device
Now that Find My Device is enabled and configured on the computer, you can use the same Microsoft account to track it and even lock it. Here is how:
-
Open the Microsoft account devices page and log into your Microsoft account.
-
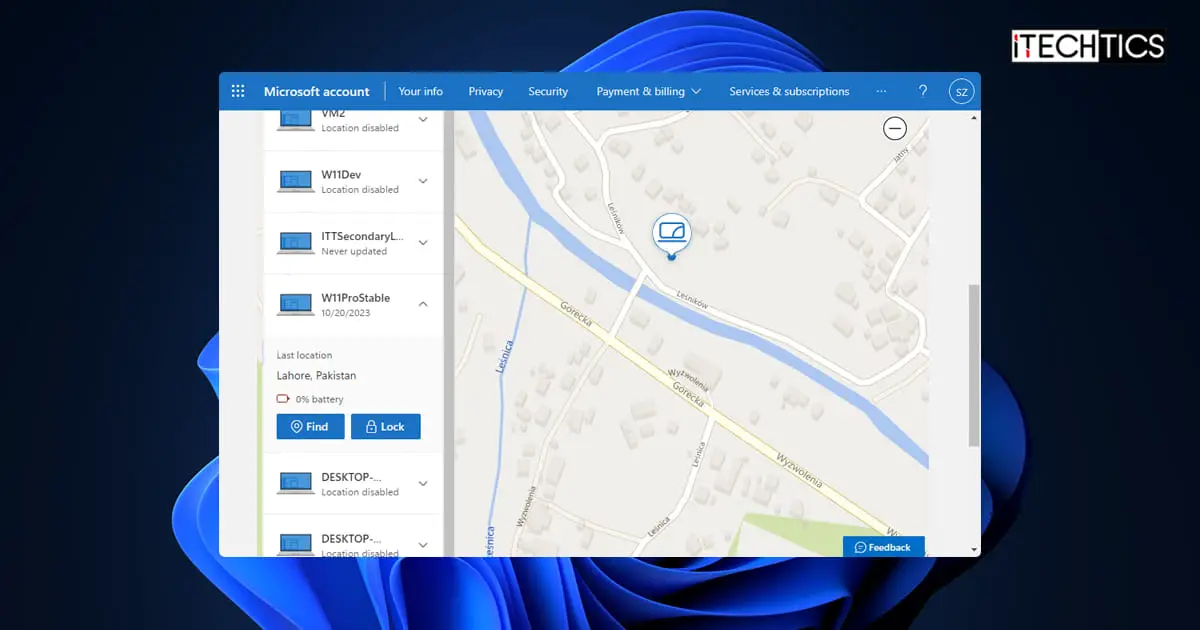
Click “Find my device” at the top.

Find devices -
Click on the device you want to locate from the left bar.

Click on the device to locate -
Click Find.

Find the device It will now scan for your device and pinpoint its location on the map. You can the map to track your device.
-
In case the device has been stolen, click Lock to lock it.

Lock device -
Write what you want to display on the remote PC once it is locked and then click Lock again.

Enter the lock screen message -
When the lost device has been locked, you will be prompted with a confirmation message. Click OK.

Device locked with Find My Device


When the device is locked, the lock screen will open on it with the message that you entered, as shown in this image:

Note that you can continue to track your Windows device even when it is locked. However, it will still need an active internet connection. You will also receive a confirmation email that the lost/stolen device has been locked, to make sure that it was you who performed this action.
Ending words
Like “Find my phone,” “Find my device” is a feature for the Windows operating system so you can track your device’s location at all times. This feature does need some reconfiguring, but it is all worthwhile as long as you can recover stolen items.
Note that if the location services are disabled, or the computer is connected to the internet, you may come across the message “We can’t locate your device right now, try again later” and not be able to locate the device. If you are in such a scenario, we recommend that you keep calm and try and try again until you get the device’s location.


